Monday, April 3, 2023
Sunday, April 2, 2023
Hogwarts Legacy Analysis
Preface
This is an in-depth look at the story and gameplay elements of the game Hogwarts Legacy. This is not a political discussion about trans-activism, transphobia, or antisemitism. If you are watching this video hoping that I will spend the whole time dising J.K. Rowling for her personal opinions on a controversial subject, or that I will explore the supposed antisemitic slant found in elements of the game and books (it seems clear to me that the Wizarding World's goblins are a smash-up of dwarfs and goblins from Norse and European folklore - every artist gets their ideas from previous art - and are probably not the result of any Jew-hating tendencies), or that I will analyze the way that kneazle breeding reinforces heteronormative stereotypes, you've clicked on the wrong video. I'm not going to talk about being betrayed by a childhood hero, how words cause real world harm, or the alleged lack of diversity at the development studio. I'm just here to talk about the game mechanics and design in an effort to help myself (and hopefully others) understand what works and what doesn't.Overview
Hogwarts Legacy is a 3D open world action adventure game with some RPG and simulation elements. It was developed by Avalanche Software and published by the owners of the rights to much of the Wizarding World media, Warner Bro. Games. It released on February 10, 2023. You can find the video version here.Dramatic Elements
Hogwarts Legacy is a story-heavy game, but it suffers from the same issues that many of the books do: lack of original plotting elements.Characters and Story
You play as a male or female 5th year student who is transferring to Hogwarts. Right away, your flying carriage is attacked and you soon discover that you have an ability to see (and use) an ancient type of magic that most others cannot. When you arrive at Hogwarts, you will take classes, learn spells, brew potions, raise fantastic beasts, learn to ride a broom, and many other staples and tropes of the Wizarding World. You will also be introduced to a rebellion led by a goblin, and get embroiled in that. You will uncover a wizard from the past who, like Voldemort, tried to transgress the appropriate bounds of magic and brought about a tragedy. As you progress through the game, your progress in the story will be repeatedly blocked by a list of tasks that you need to complete. These might be attending a new class, completing an assignment for a teacher, or some other to-do item. Upon completing these items, you'll be able to advance and learn more about your connection to this ancient magic, and what Ranrok, the leader of the goblin rebellion, is planning. I purposefully call this a list of tasks because that is how it is presented in the UI, and that is what it feels like. When I'm hit with a set of things I need to do in The Witcher 3: Wild Hunt, I don't usually feel like I'm being gated by the developers. The things I need to do feel like a natural projection from where I am to where I need to reach. In Hogwarts Legacy, you are being tasked by...a teacher that doesn't want you to go too far without completing their homework first. You will complete several trials which reveal more about the backstory of the conflict. Eventually you will confront the dark wizard who is helping the evil goblin and defeat him. At the end, you will confront Ranrok and defeat him. There are "two" endings, but these both funnel into the same conclusion. You can choose to use the forbidden power, or keep it a secret, but Hogwarts does not become a dark, evil place after choosing the "evil" path. As you play, you can stumble upon a good number of side quests from NPCs out in the world or from students or teachers at Hogwarts. These follow many of the tropes of other lackluster side content in other open world games: there are no real effects on the game world, the quests feature no surprising twists, and the design is very run-of-the-mill. The characters themselves suffer from similar problems. Often, they are meant to evoke characters from the original franchise - such as Professor Sharp, the potions professor, being a member of house Slytherin, having shoulder length dark brown hair, and being arrogant and strict. He is clearly meant to stand in for Severius Snape. That said, although the characters are not, for the most part, poorly written, most are one-dimensional, don't have arcs, and are just not interesting.Formal Elements
Rules
Combat and Movement
You'll be able to walk, run, and jump relatively freely in Hogwarts Legacy. Like most 3D action games, you can climb on specific rocky surfaces. You can even swim on the surface of bodies of water. You will also be able to fly around on a broom and on a hippogryph, although this is limited by area: you cannot fly inside the building of Hogwarts, inside caves or dungeon areas, nor inside the town of Hogsmeade. The combat has received a lot of attention. You have a basic attack that you can spam over and over. Your other combat spells each have a cooldown and different color: red, purple, and orange. Your magical enemies will periodically cast a color-coded shield, and you must use a spell of matching color to break the shield. You can use different fire and ice-based spells, together with some physics-based push, pull, slow, and slam spells. These are all flashy and fun to use, and they can be combined holistically: use Levioso to fling an enemy up into the air, juggle them a bit with basic attacks, then use Accio to bring them up close and personal before crisping them with Incendio and smashing them into another enemy with Depulso. You can "parry" many magic attacks using Protego, and you can dodge others that are not blockable. Holding the parry button will trigger a Stupify counterattack. There are two last twists - potions and combat plants, and ancient magic. Potions, such as Focus - which reduces cooldowns; or Edurus - which increases your defense, can be drunk in a pinch. Combat plants are things like Chinese Chomping Cabbage (bobs around and attacks nearby enemies), or Venomous Tentacula (shoots poison at enemies). These are selected from the same ring-based menu and triggered by the left bumper. As you attack, dodge, and use Protego, you will build up your Ancient Magic meter, which lets you unleash a devastating attack against an enemy. There is a secondary use of Ancient Magic, which lets you fling environmental objects into your enemies using the right bumper. These could be explosive barrels, rocks, or the disarmed weapons of your enemies themselves. This is totally context dependent - if there is something flingable, you'll be able to fling it.Enemies
There is a good variety in the enemies - you have dark wizards, poachers, goblins, mongrels, spiders, and trolls. In each category, you have several different classes and types.School Simulation
This is for the "I get to be a student at Hogwarts!" fans. There are a number of classes you can attend, and most of these are based on scenes from the Harry Potter books and movies. There are a few minigames related to using Accio, or mixing a potion.Animal Raising Simulation
This is for the Fantastic Beasts fans. You can "rescue" different species in the wild, release them into the microcosms inside the Room of Requirement. You can decorate these areas, feed your beasts, groom them, and if you have a male and female member and a breeding pen, you can breed them.Inventory
There are six gear slots: handwear, facewear, headwear, neckwear, cloaks and robes, and outfit. As you explore, complete quests, and kill enemies, you will pick up a lot of gear. Many of them can be upgraded by using different materials harvested from rescued beasts. There are also traits, such as increased damage against mongrels, or reduced damage from trolls, that can be unlocked through completing challenges or found in the environment and applied to your gear. Lastly, there is a transmog system which allows you to change the appearance of any piece of equipment.Collectibles
There are tons of collectibles and activities in Hogwarts Legacy. There are bandit / poacher camps to clear out, hot spots of Ancient magic to find, Merlin trials to complete, field guide pages to collect, Demiguise statues to find, a house chest to unlock by slapping flying keys, combat arenas to clear, broomstick races to complete...I feel breathless just saying this many, but there are more.Leveling up
Leveling up is tied to completing field guide challenges. As you unlock these different challenges, and as you progress through completing one of them, you will gain XP. From level 5 to level 40, you will be given one talent point to spend at each level up. There are 5 skill trees, with 10 (Spells), 10 (Dark Arts), 16 (Core), 4 (Stealth), and 8 (Room of Requirement) skills, respectively, that you can unlock. These are mostly tweaks to how spells work: as examples, you can unlock a shock wave that will spread out when you use Descendo to smash an enemy to the ground, or you could increase the amount of time that an enemy will remain stunned by Stupify.Boundaries
There are limited slots for your gear, such as masks or glasses, scarfs, robes, hats, and regular outfits. Let me say that again: in Hogwarts Legacy, part of the Wizarding World, the same franchise that features tents that are bigger inside than out, bags of essentially infinite capacity, and the microcosms inside briefcases from Fantastic Beasts, has limited inventory space. A question to whoever designed this: why?. And you regularly encounter new items which you cannot pick up, cannot even check the stats on, until you destroy an item you currently have. This happened to me quite often on main quests and during side quests, both of which feature areas which you will not be able to enter again, leaving you with no choice but to destroy one of your currently held items. Oh, and you cannot sell ingredients (herbs or materials harvested from animals) to vendors, meaning that selling gear is almost your only source of income for most of the game, yet you are still forced to destroy these items. The only way that you can increase your inventory capacity is by completing set numbers of Merlin Trials, which are magic based puzzles scattered around the game. This makes no sense at all. I have have no idea why this is in the game, but, there you have it. In the Room of Requirements, there are also limitations for each category of item: potion tables, growing tables, breeding corrals, etc. I'll just reiterate the limitations on the use of your broom here. These usually appear as a text warning "Landing is not available" or "Cannot enter while riding a broom," and you will encounter some kind of magical shield going around the map borders and the town of Hogsmeade. One last boundary is enemy scaling. Each region of the game has an enemy level range - the enemies will try to scale to your level within that range. So if you are a level 5 but the scaling range is 10-30, the enemies will scale to level 10, whereas if you are level 35, they will scale up to 30.Outcomes
There are a number of different endings, but these trigger a few minor cosmetic changes. No matter what, you will have to confront the dark wizard and the leader of the goblin rebellion. After you reach level 34, it is possible to take your O.W.L. exams and to receive the yearly cup through the intervention of one of the professors (just like Dumbledore's intervention in the books).Dynamic Elements
Dynamic Friction
The dynamic friction pattern makes its usual appearance for character leveling and for challenges. Each level requires a larger amount of XP than the previous one, and each challenge requires you to execute the action more times than the previous one. A second instance of the dynamic friction pattern is in enemy scaling. As mentioned before, enemies will try to scale to your character's level, as long as your character is within the area's scaling range. If you are over or underleveled for the area, the enemy will clamp to the upper or lower limit, respectively.Static Engine
The static engine pattern occurs in the Room of Requirement plant resource spawning and in the beast resource harvesting. These are on timers of various lengths, but you are guaranteed to receive the resource after waiting.Stopping Mechanism
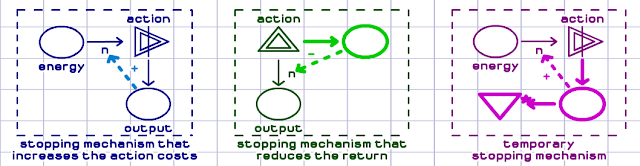
The stopping mechanism pattern mainly appears in the cooldowns for the various magical spells in combat. This prevents the player from spamming them.Worker Placement
The worker placement pattern appears in your spell selection pad. You can equip up to 4 spells at a time for quick use, and you will eventually unlock up to 4 sets of these for a total of 16 that you can switch between at will. That said, you can swap out any of these 16 for any of your spells - a potential of 23 different equippable spells (not counting your basic attack, ancient magic attacks, Alohamora, Petrificus Totalus, Revelio and others that are always available or are contextual available). Another instance of worker placement is in the potting tables. You can swap out what plant is being raised at any point.Conclusion
I turned 40 years old a few months ago, and it struck me that one of the reasons I never got into Harry Potter originally was that I was already 15 when the first book was released. At that time, I was just getting into slightly more mature fantasy series, like Wheel of Time and A Song of Ice and Fire. In any case, I bypassed Potter-mania, and when the movies started to come out I was pretty underwhelmed and stopped watching after the Prisoner of Azkaban. Two years ago, I decided it was high time that I start studying Japanese again, and I randomly decided that I would read Harry Potter and the Sorcerer's Stone in Japanese. It took the better part of 7 months, but I was able to read it, out loud, in Japanese. I'm currently about 100 pages into Harry Potter and the Chamber of Secrets. I have finally watched all 8 of the Harry Potter movies, and the first movie of the Fantastic Beasts series. I say this to give you some background into my relationship with the franchise. Whatever you might think of J.K. Rowling's political opinions, she is not a bad writer. She is not amazing either, but she is definitely competent. She knows how to plot a story, write decent characters, and describe scenes without tripping over her own feet. That already places her in a class above, say, Dan Brown or E.L. James. Hogwarts Legacy belongs to the same class: competent, but not amazing. The world itself is gorgeous, and has clearly received hours and hours of love and care to make it look the way it does. The music evokes the atmosphere of the movies wonderfully, and there are hilarious bits of lore scattered everywhere. Most of the puzzles make varied use of your magical abilities, and although not mentally taxing, provide a welcome diversion from the combat. And the combat is solid - it is fast, fun, and frenetic. As an open world game environment, however, the developers have copied many of the same elements that gamers have grown tired of over the course of the last 10 years: lack of dynamic world events, collectibles that are there more for filling the massive space than for any meaningful purpose, copy-pasted bandit camps, side activities that are included for sake of completeness but never fully fleshed out, non-reactive characters and environments, and much more. Just like the exploding red barrels in Ghost of Tsushima, Hogwarts Legacy has included a lock picking minigame. You have Alohamora, for fuck's sake - what is the point of the minigame if you have the spell? No other spell works this way! And even worse, the lock picking is just a window dressed version of finding the correct angles on the twin sticks (the same activity as decrypting passwords in the Arkham series, or focusing on Elvish runes in Shadow of War, which makes me wonder if Warner Brothers Games force their studios to include this...). This is not the same level of phoned-in game design as recent Ubisoft titles, but it is just a few steps above. And speaking of Ubisoft, the horror of the UI deserves special mention here. The left stick controls a cursor, which must be manually moved over to the element you want to select. There are almost no situations where the bumpers or triggers can be used to switch between menus, and none where you use the D-pad to switch between menu items. Buying and selling requires holding the A button on the Xbox controller for a second, which disincentivizes going to the shops. I'm not sure of the logic of this, but it makes for a painful experience any time you need to go through several menus. The "RPG" elements of the game also leave more to be desired. In terms of RPG mechanics, you are technically limited to 35 talent points versus 48 unlockable skills. I cannot imagine many players investing in the 4 skills in the Stealth tree, so let's go with 44 skills. None of your skills drastically changes the effectiveness of your different spells, so you can freely choose among the skills and you will probably end up playing the game in a similar way to much of the rest of the player base. The particular spells you use in combat don't matter so much, as long as you have one Control spell (coded yellow - Arresto Momentum, Glacius, Levioso, Transformation), one Damage spell (coded red - Bombarda, Confringo, Diffendo, Expelliarmus, Incendio), and one Force spell (coded purple - Accio, Depulso, Descendo, Flipendo) equipped, you will be able to go through most combat encounters smoothly. The equipment also amounts to playing dress up. There are only two stats - offense and defense, and you just have to equip items which have the biggest of the those numbers. Having traits and upgrades tied to the beasts in your vivarium is a nice touch, but it is still quite shallow. In terms of RPG narrative elements, you can't become a superevil character, despite slinging around unforgivable curse after unforgivable curse. I don't really want to hear that we are roleplaying a Hogwarts student, and clearly no Hogwarts student would become evil - just hand-wave about Draco, Voldemort, and all the rest. Further, the NPCs will not really react to what you do or don't do, either. Again, this feels the same as many of the other open world RPGs of the last decade - I'm looking at you Bethesda. Regarding the sim elements, we have the same problems. You can customize your wand and broomstick, and the game developers have lovingly recreated scenes from the books and movies (such as the mandrake scene in herbology class, or the first time you ride a broomstick), but there are no consequences of class attendance or performance, or your wand choices. Long wands are not slower, for example, and flexible wands do not increase crit chance. The different cores have different descriptions, but they are just window dressing. There are cut-scenes where the teacher will say "Well done, Harry McLightingFace! Points to Hufflepuff." However, you can't affect the points for the different houses by your actions. You can't make Slytherin the masters of the school by answering questions in class or by following the rules, you can't sabotage other houses, and there is no affect of getting these points. These scenes are just there for show. The other main sim elements, taking care of the beasts, are similarly shallow and facile. You brush them and feed them, and you periodically get some resource from them. But they never eat each other because they are starving due to your lack of care (since you've been busy riding your broomstick and zapping goblins and haven't stopped by the Room of Requirement in ages) nor just because one animal is clearly a carnivore and the other is clearly its prey - you'll never come back to your vivarium to find your kneazles with potbellys and your puffskeins nowhere to be seen. They don't get sick. They don't have life satisfaction meters related to the type of environment in the vivarium. They don't escape or attack each other, unlike the dinosaurs in Jurassic World: Evolution. The system is there, but it does very little. The Room of Requirements, as a whole, however adds some much needed complexity. The different ways you can set up your plant stations, fertilizer stations, potion stations, etc, are sure to keep some players busy for a time. The way that beasts tie in to upgrading gear is sensible, and the fact that you can breed beasts and sell them for extra money is useful since in the early and midgame money sources are limited, but this also created a lot of dissonance for me - like, how is this different from the poachers? In any case, I found potions mostly useless, with the exception of the Wiggenweld / Healing potion, and I only made other potions to complete task objectives. The combat plants were occasionally useful, but again, I mostly only used them to complete a combat feat or task objective. To wrap things up, Hogwarts Legacy is not a 1 out of 10, the opinion of sex toy reviewer specialist Jaina Grey over at Wired not withstanding. It is not a 10 out of 10, either, whatever Angry Joe would like you to think. If I were rating this game, I'd give it a solid 7 or 8. It is competently executed in many areas, but has some serious design problems in others. Many of the design problems stem from copying the open world play book that many developers have been using for the last decade. Others stem from trying to stay true to the feeling of the Wizarding World franchise, which is not very well-thought out and makes very little sense in and of itself. Still others are just bad choices made by the developers. Should we give them some shit for their bad choices? Yes, of course. Should we praise them for the areas where they have excelled? Definitely! Should we be fanboys and give them a free pass? How about no. Should we go all political and barely talk about the actual game at all? Again, no. Hogwarts Legacy has undoubtedly benefited from the controversy surrounding J.K. Rowling, but that does not mean it is not worth your time. There are many moments of wonder and fun to be had here, but there are a lot of confoundingly poor design choices, too. Hogwarts Legacy is not an evil game created by a team of evil developers based on an evil franchise written by an evil person. It is a mostly fun piece of entertainment that I'm sure fans of the Wizarding World franchise will love. Even as something of an outsider, I enjoyed a lot of my time with Hogwarts Legacy, while I found the story pretty lackluster and many elements of game design shallow. I can say much the same about many other open world games - Watchdogs 2, or Days Gone, or Fallout 4, for example. To pull out my favorite overly dramatic Aleksandr Solzhenitsyn quote: "If only it were all so simple! If only there were evil people somewhere insidiously committing evil deeds, and it were necessary only to separate them from the rest of us and destroy them. But the line dividing good and evil cuts through the heart of every human being. And who is willing to destroy a piece of his own heart?"Outro
I hope that you found my analysis and discussion of this game informative and useful. Until next time!Thursday, April 8, 2021
Ghost of Tsushima Game Analysis
You can find the video version of this analysis here.


Overview
Ghost of Tsushima is an open world action stealth game developed by Sucker Punch Productions and published by Sony Interactive Entertainment in July 2020. It has only been released on the Playstation 4 and 5. It is set in a slightly fictionalized version of Japan in the year of 1274, during the Mongol invasion of Japan.
Dramatic Elements
Ghost of Tsushima features a lengthy and involved story. Consider this your spoiler warning. If you don't want to know anything about the characters and story, please skip ahead to this section.
Characters and Story
Main Story
Ghost of Tsushima follows the story of the fictional samurai and head of the Sakai clan, Jin. His father died before his eyes when he was young, and his uncle, Lord Shimura, raised him.
At the start of the game, Jin, Shimura, and all the samurai of Tsushima have gathered together to face the Mongol invaders. Similarly to the real historical events, the initial battle does not go well for the Japanese, who are soundly defeated. Shimura is taken captive by Khoutun Khan, a fictional relative of Kublai Khan, the leader of the Mongol Empire. Jin is left for dead on the battlefield, but is rescued by a local thief, Yuna. Because Jin is young and idealistic, and frankly foolhardy, he goes to rescue his uncle by himself, and is promptly thrown from the bridge to the castle. He barely survives.
This conflict, between Jin's views of samurai honor and duty, and the more prudent path, makes its first appearance here. After surviving, Jin finds Yuna again and the two begin gathering allies, much like in Kurosawa's Shichinin no Samurai. You complete a few quests to gather them to your side, and to expand your movement abilities with a hook for climbing, and you set off to free your uncle a second time. Your allies include Yuna's brother, Taka, their friend Kenji, your friend and ronin Ryuzo, a famed archer named Ishikawa, and a local noble and warrior named Lady Masako.
Although you are betrayed by one of your allies, you manage to free your uncle. This opens up the middle section of the island, and you begin another round of quests to get reinforcements and allies.
This time the climax does not proceed smoothly. When you breach the castle walls and are about to enter the main keep, many of your soldiers are killed by a Mongol trap. Jin and his uncle come to a head about this: Jin insists that he should be allowed to sneak in, take out some of the Mongols, and allow the soldiers to enter with less resistance. Lord Shimura wants to do things the samurai way, which while honorable, will undoubtedly get many of the soldiers killed and may even result in a loss. Jin decides to sneak in and poison the Mongols and he has a final showdown with his betrayer.
Although the siege was a success, Jin's uncle waits for word from the shogun to put him on trial for conduct unbefitting a samurai. One of his friends helps him escape, and you begin yet another round of quests to gather allies for the final push to expel the Mongols from Tsushima.
After defeating the Mongol general, there is a short epilogue where Jin will confront his uncle. You may decide to spare his life or kill him, but this has no ramifications on exploring the world afterwards.
Character-Based Quests
There are a large number of character-based quests in Ghost of Tsushima. You will only have to complete the first step of Ishikawa and Lady Masako's quest in order to recruit them to your cause and can safely ignore them for the rest of the game if you wish.
Ishikawa is a famous archer, and his quest revolves around tracking down a former student of his who appears to be helping the Mongols and teaching them the secrets of Japanese archery. I enjoyed the nuances of this story-line quite a bit, as it becomes clear that you can see the student's actions, and Ishikawa's under a few different lights.
Lady Masako's story is a straight-up mystery revenge plot. You will probably guess who the architect of Lady Masako's misery is a few stroy beats before the finale, but it is still an enjoyable tale.
Yuna's tales all involve some aspect of her checkered or horrific past.
Norio is a warrior monk you will meet after rescuing your uncle. His stories are about re-establishing Cedar Temple, tracking down captured monks, and getting revenge against the Mongols for killing his brother.
Kenji's tales usually involve him trying to grift someone unsuccessfully, and provide a bit of comic relief.
Formal Elements
Players
Ghost of Tsushima is a strictly single player game, although there is a "Legends" playmode that is multiplayer.
Rules
Movement and Combat
Like many open world games, Ghost of Tsushima has a complicated set of rules regarding movement. Jin can walk and run around the game world, although his running is limited by an invisible stamina meter. He can also climb on buildings, vault fences, and climb rock ledges that have been marked as climbable. Jin can swim, and can hold his breath underwater for a about 20-30 seconds in order to evade the attention of enemies. After you have received your grappling hook, you can use this to latch onto specially marked points and swing or climb them. Jin can jump across quite large gaps even without using his hook. If you fall from too large a height, you will take damage and may die. Later on, you can increase this distance by unlocking the ability to roll when you land and soft the force.
You can also move around the map using your horse. Your horse will jump over low barriers automatically, and has unlimited stamina. If you fall from too large a height while on horseback, you will die and must reload a save. Lower heights will simply cause you to fall off the horse, receiving no damage. Your horse cannot be killed, and like in many open world games can be called to your side by whistling.
Combat is quite fast, and enemies have shorter tells compared to many other melee combat games. You will use the same weapons through out the game: a katana for melee combat, a tanto for stealth kills, a bow for ranged combat, and a heavy bow for dealing more damage. Later on you also get a blowgun, but this is of limited use.
When engaged in melee combat, you can use light and heavy attacks in different stances to best take down the particular enemy you are facing. Heavy attacks deal more damage, and are mostly used to build the stagger meter on your enemies when they are blocking. The Wind stance is most effective against enemies using spears or halbeards, and you can use heavy attacks to knock them off their feet and deal stagger damage to them. Staggered enemies cannot block or defend themselves for a few seconds, so staggering them is quite effective. Stone stance is best for other swordsmen, Water is best for shielded enemies, and Moon is best for brutes. When an enemy attacks you, you generally have the same options as you do in Sekiro: Shadows Die Twice: you may dodge, block, parry, or jump. A low sweeping attack may be jumped over, and most attacks can simply be blocked. If you block at the last moment, this triggers a parry and you may perform a counterattack. Dodging allows you to avoid the attack completely, and may be necessary quite often in the early game, as the enemies will have many unblockable attacks.
Performing parries replenishes some of your resolve, as does killing enemies. Resolve can be used to heal, and (similarly to Sekiro) also to resurrect yourself if you die in combat. Most of your legendary techniques cost different amounts of resolve to use.
In practice, however, the combat feels very different from Sekiro. First, the types of attacks that are unblockable change over time as you level up. Second, unlike Sekiro, you do not have a stagger meter yourself. You can block as much or as long as you like and as long as enemies do not perform an unblockable attack. This removes most of the feeling of standing toe to toe against a powerful enemy without flinching or hestitating.
Fear also plays a large role as the game progresses. You will unlock armors and techniques which increase the fear of your enemies. Performing these techniques will cause nearby enemies to drop their weapons and cower in terror, or even runaway.
The stance matching is also a difference from Sekiro, and it doesn't feel similar to the stances from Nioh, either. The best comparision is actually the stances from the original Witcher game, with certain enemies being most vulnerable to particular stances and resistant to others.
The last difference is with difficulty and strategy. The enemies gain more armor as you progress through the game, with enemies in the first area being mostly unarmored, and those in the last being the most heavily armored. However, it still only takes a handful of sword swings to kill any enemy, with the exception of bosses and duel partners. Even for the bosses, you can handle these using the same techniques that you use on all the other enemies, and you don't have to use particular strategies or armor to fight them.
While the combat is fun and engaging at first, and it always looks stylish and cool, I found myself using basically the same strategy with nearly every enemy encounter in the game: match my stance to whatever weapon they have, then begin attacking and building their stagger meter. Parry any of their attacks, and continue until they are dead.
Stealth
Besides holding your breath underwater, you may enter a stealth mode on land. You will crouch down and it will be more difficult for enemies to spot you. You can throw wind chimes to attract enemies' attention to particular points, and they will also come to investigate fallen comrades.
If you get close to an enemy from the rear you can stealth kill them. You may also stealth kill an enemy by leaping on them from a height, and later on you unlock the ability to chain a few stealth kills together if there are other enemies nearby.
Using the bows and blowguns further allows you to silently take out enemies from a distance.
There is also a stealth vision mode which lets you "hear" enemies through barriers and at a distance for increased tactical play.
The movement system plays a critical part in stealth gameplay. You can approach a Mongol camp from the rear using cliffs, take out enemies from above, and use towers, your grappling hook, ropes strung between buildings, and the heights of the buildings themselves to sneak around like a ninja and take out enemies with relative impunity. Some camps have signals or enemies with horns who will call reinforcements if alerted, making for an increased challenge if detected.
This smoothness in slipping back and forth between a "dirty, under-handed" approach and calling out individual enemies for a duel is at the heart of the main conflict in Ghost of Tsushima.
Inventory
Ghost of Tsushima has a simple inventory system. You have a limited number of slots for quick items, and you can replenish them by purchasing them from vendors, or finding them scattered around the world. Besides these, there many different types of resouces you can find, including something just called supplies, different kinds of wood, cloth, and metal. These are used to upgrade your armors and weapons.
You cannot drop items, and there is a cap of 500 for the crafting resources. These can be sold for supplies at vendors.
Any headbands, masks, helmets, charms, weapon kits, or armor set you have picked up will remain in your possession, allowing you to change them at almost any moment.
Level up
The leveling system in Ghost of Tsushima is tied to your progress through the main story, the number of Mongol camps you have liberated, and the number of sidequests you have completed.
As you can see in the table, completing each "legend" level grants a number of technique points along the way. It also increases your health, and sometimes gives you a charm.
| Legend Title | Number of Technique Points |
|---|---|
| The Broken Samurai | 2 |
| The Wandering Samurai | 3 |
| The People's Hope | 4 |
| The Unyielding Wind | 5 |
| The Shadow Samurai | 6 |
| The Hero of Tsushima | 6 |
| The Avenging Guarding | 7 |
| The Phantom Samurai | 7 |
| The Demon Blade | 9 |
| The Raging Storm | 9 |
| Ghost of Tsushima | NA |
These technique points can be used to unlock buffs for your four stances, improve your ghost weapons, and progress through two skill trees titled Deflection and Evasion.
Conflicts
I have already mentioned the conflict between the notions of honor and practicality. This manifests itself between Jin and himself, as he must reject some of his past and his beliefs in order to rescue his uncle, and it also appears between the two men themselves.
This appears in terms of gameplay, as you will switch back and forth between samurai-inspired sword-play and ninja stealth climbing and assassinations.
Another aspect of this is the conflict between the Japanese and the Mongols. Besides the physical conflict, the Mongols represent practicatilty and a certain Machiavellian attitude, while the Japanese represent honor and inflexibility.
Finally, you see this same struggle between Jin and the various ronin and bandits you encounter randomly as you travel around Tsushima.
Boundaries
I have already mentioned the limitations regarding inventory. Besides those, there are story-based movement restrictions. Once you have escaped from your uncle in act 3, the first two areas of the game become inaccessable until you complete a certain mission. Other areas will be blocked off until you have completed the necessary parts of the story.
Outcomes
There is one main outcome: you defeat the leader of the Mongol invasion, and drive the Mongols from the island. Your dialogue choices throughout the game, the choices you made in composing the different haiku, how far you have completed the stories for Yuriko, Kenji, Yuna, etc, whether you decide to kill or spare your uncle in the final confrontation...None of this has any impact on the final state of the game.
Dynamic Elements
The dynamic friction pattern appears in many places. First, in the beginning, you might complete a quest with a minor legend increase, and this will completely fill one section of your legend bar, giving you a technique stone. Later on, this is minor increase will fill a much smaller amount.
Second, as you move further into skill upgrades, the number of skill points required for each skill will sometimes increase.

The static friction pattern also appears in the skill trees. Most of the skills cost a single point.

The escalating challenge pattern makes a minor appearance in Ghost of Tsushima. The enemies do somewhat increase in power as you progress through the game.

The play style reinforcement pattern appears mostly in the form of whether you choose to clear a camp with stealth or with samurai combat. Clearing camps is one of the main side forms of receiving legend increases and technique points, which you can then use to bolster your prefered play skill set. Your main armor set usually has a small contribution to your different attack stats, and thus may be included in this pattern. The different masks, headbands, and helmets have no effects on gameplay.

The static engine makes its classic appearance as the generator for technique points. You get them at pretty regular intervals for completing side quests, main quests, and clearing camps.

The trade pattern makes a minor appearance in that you can sell crafting items to receive supplies.

The stoppping mechanism appears in the familiar places: you have a limited amount of resolve, and limited means for replenishing it, an this stops you from spamming your healling abilities and special attacks.

Conclusion
Let me mention here that I studied Japanese in college, and that since 2009, I have been living in Japan. I grew up watching the Teenage Mutant Ninja Turtles, and soon after that graduated to Ghost in the Shell, Berserk, Lone Wolf and Cub, and a host of other Japanese anime and manga. Although technically we don't have "belts" in Japanese fencing, I have a second degree black belt in kendo.
During my time in Japan, I have visited several dozen castles, more shrines and temples than I can count, and visited approximately half of the 47 prefectures. My wife is Japanese, and although I am not fluent in Japanese, my Japanese ability is passable.
In terms of its looks, it is difficult to think of a game that captures more of the spirit and palette of Japan. The only one that comes immediately to mind is Total War: Shogun 2, and even that game pales before Ghost of Tsushima. In many ways, it is actually more Japanese than Japan itself is. Modern Japan has huge areas in the cities and suburbs that could easily be mistaken for New York, London, or Sydney. Of course, these cannot be featured in a game set in 1274, but still...if you explore the countryside as I have, you will find vistas that would not look out of in France, Switzerland, or any other country with a temperate climate.
The developers have instead condensed the essence of Japanese scenary and jammed it all onto the island of Tsushima. Thus, although the invasion landed on Tsushima on November 4th, 1274, the early game scenary is made to feature foliage from early autumn and summer. The northern section of the game is meanwhile covered in thick drifts and a layer of snow, despite being only 70 kilometers from northern tip to southern tip in the real world. The middle area is home to a swampy area with elevated broad walkways similar to what you can find in Oze National Park, stands of bamboo that you can see in many asian countries, and dramatic sea cliffs like in Jogasaki.
Having listened to the Japanese audio version of the game, I can tell you that although there are trees with white flowers that drop in the wind like the famous Japanese cherry blossom trees, they are not called "sakura" in the game. If you are at all familiar with cherry blossom trees, you know that they bloom in the spring, usually between late February and early April. In the game, these trees are sometimes referred to as having been struck by lightning. One minor grudge with the Japanese audio is that the lips of the models are automatically synched to the English version of the game, no matter which one you're listening to. Since the dialogue is unskippable, you are stuck looking at what appears to be a badly dubbed American movie.
On the plus side, the character design and relationships are great. The characters are all voice-acted superbly, and the story itself, while not groundbreaking, is sold. There are no romance storylines, thank god, and the animation quality is top-notch.
In terms of combat and movement, the game attempts to bring to video game format both the speed and tension Akira Kurosawa's samurai movies, and the fluidity, grace and brutality of a stealth ninja movie, such as Enter the Ninja or American Ninja. The cinematic references themselves mirror some of the developer's own stated influences. I cannot praise the developers enough in the first of these tasks. The combat is fun and tense, navigation is fluid and smooth, and the game simply looks fantastic. The AI has received criticism for being simplistic and making stealth somewhat easy to pull off, but that is a minor problem.
Where I have to level harsh criticism is in the extraneous game elements. In the game, you can collect banners from different samurai clans in order to receive costmetic upgrades to your saddle. You are also rewarded with chucks of story for each upgrade you purchase. But, there are 80 of these banners scattered around a large, vertically challenging landscape.
Furthermore, you can visit Inari shrines to upgrade your charms, but there are 49 of these. Following a cute fox to get a minor reward is entertaining the first 5-10 times, but 49 is ridiculous. Then there are the large navigational puzzles when you visit regular shrines, and thankfully there are only 16 of these. You can compose haiku in specific locations, and there are 19 of these. Composing haikus gives you a headband, which you will probably never wear. If you liberate all the Mongol held villages, camps, breweries, mines etc, you will have done so 57 times. There are 18 hot springs to soak and relax in and receive a slight health increase. There are 23 Pillars of Honor, which give you a skin change for your sword and tanto, most of which you will probably never use. There are 16 Bamboo Strikes, where you complete a minigame to increase your resolve. There are 40 Records, which are snippets of text written by Japanese refugees or survivors, and there are 50 Mongol Artifacts to collect, which explain more about the Mongols. There are 8 lighthouses that you can light, because apparently the developers felt there were not enough pointless activities already.
Do hot springs feature prominently in Japanese daily life and culture? Yes, of course, and they have for hundreds of years. Same for haiku, visiting shrines, etc. What I object to is the size of the island and thus the number of these activities. According to Twinfinite, the game world is approximately 29 km2, which while that might seem large, is about half the size of The Witcher III plus DLC maps. This 29 km2 is also a 10x reduction from the actual size of Tsushima, which is about 274 km2. I feel that the game could have been made half the size it is, and thus with half the number of activities. The alternative would be to slightly reduce the size, and simply eliminate some of the activities or greatly reduce their number. Increasing the movement speed of your horse might also help.
In the current game, the sheer repetition of them, which is required in order to make the large game world feel full and to increase the chances of a player stumbling on one of these activities, is onerous and tedious, and many of the activities are highly unoriginal to boot. Collecting banners has been done by Ubisoft since Assassin's Creed in 2007, which also featured climbing towers, incidentally. Navigational puzzles of the same or similar design and caliber can be found in 2007's Uncharted or even earlier in God of War (2005) or God of War II, also released in 2007.
There are seven mythic tales, which give you either legendary armor sets or new abilities to use in combat. This is the perfect number! We don't need 35 of these! There are 26 side quests that you can find by talking to villagers or peasants you rescue, and there are 37 quests that are tied to specific characters: 10 for Masako, 9 for Ishikawa and Norio, 4 for Kenji, 3 for Yuna, and two for Yuriko.
To beat this dead horse a bit more, these 26 side quests and 37 character based quests are a side effect of the size of the game world. We simply don't need this many. If they offered twists or difficult decisions the way that Witcher quests often do, it would be wonderful. Most of these are straighforward and unimaginative, however.
As explained before, Ghost of Tsushima has RPG elements. There are 7 Deflection skills and 7 Evasion skills, there are 5 Ghost Weapons, with a total of 9 upgrades, there are 7 Evolving Tactics skills with a total of 13 upgrades, and there are 4 combat stances with 4 upgrades each, for a total of 16 skills. You will probably not find yourself using most of the Ghost weapons very often, and in any case the way that you equip them involves an arcane combination of trigger buttons, D-pad buttons, and face buttons. The reason you will probably not use them so often is because they are simply not necessary. If you compare the Ghost weapons to the different combat abilities in Shadow of Mordor, the Ghost weapons come out poorly. In Shadow of Mordor, you need to use every ability you have to survive the more difficult combat encounters. However, in Ghost of Tshushima, every combat situation can be gotten through using Jin's unupgraded combat stances, without resorting to smoke bombs, sticky bombs, kunai, or the other items. The AI simply is not aggressive enough or smart enough, and enemies do not swarm you the way they do in Shadow of Mordor to necessitate the Ghost weapons.
Continuing the litany, there are five skills that have no other purpose but to unlock the ability to use the Guiding Wind to find different types of locations or items.
Now, don't get me wrong. I love RPGs. I have put over 450 hours into The Witcher series, with the bulk of that being The Witcher III. Across all my playthroughs of Demons Souls, Dark Souls, Dark Souls II, Bloodborne, Dark Souls III, and Sekiro: Shadows Die Twice there are probably another 700 hours or more. Dragon's Dogma: about 40 hours. Ashen: about 20 hours. Diablo III: about 50 hours. Adding in Morrowind (90 hours), Oblivion (500 hours), Skyrim (450 hours). Fallout 3 (30 hours). Fallout: New Vegas (60 hours). Fallout 4 (90 hours). Grim Dawn (70 hours). Vampyr (40 hours). About 160 hours each for the two Mount and Blade games. I hope I've established my RPG cred with this little list. There are many other games I could add, but you get the idea.
But Ghost of Tsushima does not need all the skills that it has. Similar to the activities, its skill trees have been bloated beyond what is necessary. As one example, the stances each have 4 upgrades. For some stances, these actually add the ability to block attacks that previously had to be dodged, which changes the way you use that stance in combat, but most of them are simply percentage upgrades to building stagger. This is boring and lazy design. It would have been better simply to leave these elements out than keep them in in their current implemention. In similar vein, the five skills for finding objects using the Guiding Wind in particular are simply there because the world is too expansive and finding things can be a pain. These, and the stance skills, would not be needed if the game world design was reduced in scale. Sucker Punch has been copying the playbook of Ubisoft's open world game design wholesale, and in all the worst ways.
One last item in the category of pointless things. You can engage in dialogue periodically with NPCs, and you are often given two or three choices, but these have no affect on the game. They do not alter Jin's character in any way, and they do not change his relationship with other characters. They do not take you down different paths in the story. All you do is press a button and hear a slightly different piece of dialogue.
To finish this analysis, the gameplay itself is quite fun, and the world is abolutely gorgeous. These positive elements are dragged down by rote open world activities, skill design that is lazy, and game design so unoriginal that it includes the ubiquitous red barrels that explode...in a game set in 1274! These in turn are made necessary by a world that is too large for the story it is trying to tell. If you try to complete most of the side activities, you will spoil your enjoyment of the game.
Wednesday, March 24, 2021
Hades Game Analysis
You can find the video version of this analysis here.


Overview
Hades is an isometric hack and slash rogue-like game developed and published by Supergiant Games. Development began following the release of their previous title, Pyre, and Hades was initially released as an early-access title in December, 2018 on the Epic Game Store. This was followed by an early-access release on Steam one year later, in December, 2019. The full version of the game was released in September, 2020.
Dramatic Elements
Hades is an extremely story heavy game. Consider this your spoiler warning, although if you are familiar with Greek mythology, you might not find much that surprises you.
Characters and Story
In Hades, you play as Prince Zagreus, the son of Hades and Persephone. He is an instantly likeable character - he is funny, determined, and interacts sympathetically with everyone he speaks to. Prior to the start of the game, he had been led to believe that Nyx, the personification of night, was his mother, but after discovering that Persephone was his true mother, he determines to escape the underworld and reach her. The game follows his struggle to reach her and learn more about why she left.
Besides Zagreus, there is a huge cast of characters. You will interact with Orpheus, the famous Greek singer of legend, and his muse Eurydice. Your trainer in combat was the famed Achilles himself, and you will also meet his friend/lover Patroclus. Sisyphus will give you aid during your journey, and you will battle against the Furies - Alecto, Tisiphone, and Megaera, the hydra, Theseus and the minotaur, Asterius, and finally against your own father, Hades.
Most of the gods need no introduction, so I shall just mention them here - Zeus, Ares, Athena, Aphrodite, Poseidon, Demeter, Hermes, Dionysus and Artemis. Upon learning of Zagreus's desire to escape, they will all grant you boons during your journey, and you can also receive assistance from Chaos, different companions, and by finding Daedelus's tools.
Of course, you will further a relationship with your father, Hades, and you can pet your dog, Cerberus. The maid of House Hades is Medusa, and you can have friendly competitions with Thanatos, the god of death.
As you try to escape, you will undoubtedly die many times, respawning back in the House of Hades. Once you respawn, you may further any relationships or storylines that you have started with different characters. Once you have interacted with them, they will be locked until you try to escape again.
Eventually, you will defeat your father, escape the underworld, and meet your true mother, only to discover that you cannot stay on the surface for very long, thus forcing you to battle your way out of the underworld again and again in order to reach her and learn more. You learn the backstory of your mother and father: Persephone wanted to get the F out of Olympus, and Zeus arranged for her to escape with Hades. The other gods, however, have no idea that this has taken place, believing her simply to have vanished. Demeter, Persephone's mother and thus your grandmother, is in mourning for her missing daughter, causing the surface to be covered in perpetual winter.
Your continued visits will eventually convince Persephone to return to the underworld, allowing the player to trigger the true end of the game: you will continue to develop your relationship with your father, mother, and the Olympic gods, and you will finally invite all of them to a big soiree revealing that Persephone had eloped with Hades and given birth to Zagreus. As an explanation for why Zagreus would continue to battle his way to the surface, when his mother is back home, the developers have created a great excuse: his escape attempts are basically now penetration tests, and Hades gives you the official task of finding weaknesses in the underworld's defences. After all, nobody is supposed to be able to escape. In anycase, at the party, Hades and Persephone explain that they kept her presence in the underworld a secret from Olypmus for fear of reprisal from the Olympic gods. Through your determined efforts, you become something of a hero for finally reuniting these two estranged families, that of the underworld and that of Olympus.
The game can continue to be played after this moment, since the underworld will always need tip-top security.
Besides the main story outlined above, you can complete several side quests, although reuniting estranged friends or family members remains the main theme. For example, you can reunite Orpheus and Eurydice, Achilles and Patroclus, and Nyx and Chaos. You can also complete "favors" for many of the Olympic and Cthonic gods, which is always some task related to the aspect of the god. For Aphrodite, you must complete the romance option for the three "romanceable" characters in the game, while for Poseidon you must catch 18 fish, and speak to him after catching a fish in that escape attempt.
Formal Elements
Players
Moving on the the formal elements, as is probably clear from the above, you can only play as Prince Zagreus.
Rules
Combat and Movement
Similarly to Supergiant's other titles, Zagreus's movement is restricted to a single plane, essentially controlling the same as an isometric hack and slash game. You start with a single weapon, the sword, named Stygius, but as you play the game you will unlock a spear, a bow, a shield, cestus, and a gun. According to the developers, these are like classes in an RPG: they broadly define how you will play a particular escape attempt. The sword has several broad slash attacks, a thrust, and an AOE ground stomp, while the spear has thrusts, a chargeable sweep attack, and a throw.
Each weapon has a regular attack and a special attack, and no matter what weapon you have, you can cast out a bloodstone to strike an enemy. There is also a dash for dodging. Depending on the weapon, you may be able to do a dash-attack and/or a dash-special. Some weapons also have charged attacks or charged specials, triggered by holding down the attack or special button, respectively.
Combat in Hades is extremely fast-paced, and in the later rooms you will have to deal with larger numbers of enemies than in the earlier rooms. The enemies also come in larger or more numerous waves. The different weapons allow you to use different play strategies. For example, the spear is useful for keeping enemies at a slight distance, as the thrusting attack and the thrown special allow you to deal damage from further away. Although the spear does have a charged sweeping attack, this is less useful for crowd control due to the time it takes to charge it up. The bow breaks the attack pattern of most of the weapons: it's attack is strong, but extremely slow to charge, having no regular quick attack. Its special is to fire a number of arrows in a spread pattern in front of the player, allowing for extremely effective crowd-control. As one last example, the shield has a somewhat slow attack, but charging it allows the player to block attacks in front of them and deal damage through a shield bash upon release.
As you progress through an escape attempt, you have a number of opportunities to create strongly synergestic builds. Although the particular boons and items you receive are randomly generated, by chosing appropriate ones you can create some spectactular builds. For example, once while using the cestus, I arrived at Hades with Aphrodite's Aid, Lightning Strike, Thunder Flourish, Divine Dash, Crystal Beam, Concentrated Knuckle, Stubborn Roots, and a host of other boons. The cestus starts out as one of the faster attacking weapons, but it has quite short range, and adding chain lightning to the attacks, and a thunder bolt to the special increases the range at which you can deal damage to foes. Concentrated Knuckle allows you to increase your base attack damage by +5 for each consecutive hit on an enemy, which is especially useful for enemies with a lot of health like the bosses. Stubborn roots lets your health slowly regenerate if you don't have any more lives left, which again is useful on tough bosses or encounters. Divine Dash lets you deflect damage received during a dash back at your enemy, allowing you to turn their own strength against them and maintain your health. Since you cannot block with the cestus, Divine Dash is really useful. Crystal Beam is a cast boon that alters the behavior of your bloodstones. Instead of throwing them, they drop at Zagreus's location, and fire a crystal beam that deals a small amount of damage every .2 seconds. These make the cast a kind of set and forget emplaced weapon. If you buff Crystal Beam with Glacial Glare (causes cast to inflict chill, which slows down enemies), or further combine it with Arctic Blast (applying ten stacks of chill causes a small explosion) or Killing Freeze (if all enemies are chilled they slow and decay), you have a quite powerful combination that can be used to control enemies in one area while you deal with another, or for a boss encounter, you can drop all of your bloodstones at once to concentrate their damage.
You will probably have different weapons that you prefer, and different gods whose boons match your play style better, but the variety of viable strategies is quite stunning and it is very satisfying to explore the state space on offer.
Regarding the enemies themselves, there is a pleasantly large variety. The first area of the game, Tartarus, features louts, thugs, numbskulls, wringers, and witches, among a few others. Louts are slow moving drunkards who perform a sudden charge attack, thugs are large slow moving enemies who do a telegraphed club smash, and witches are small enemies who float around the battle field and periodically cast orbs that will damage you. Most of these enemies can be killed in a few hits, although the louts and thugs usually take more.
The second area, Asphodel, features gorgons, different bomb throwing enemies, and several varieties skeletons. The skeletons all have different attack styles - bone-rakers are berserk enemies that attack in combos of 2-6 attacks, and wave-makers hurl crescent shaped waves at Zagreus. Many of the skeletons and the bomb-throwing enemies will jump around the battlefield, making it difficult to target the same enemy for an extended period.
Elysium features mostly different warrior types - brightswords, longspears, and strongbows, who when killed become a floating seed that can respawn as a new unit if it finds a discarded weapon. The final section, Temple of Styx, has the only living enemies in the game - rats and satyrs, who both can deal poison damage to the player. In any room in any area, occasionally, enemies will spawn in armored varieties, which means the armor must be chipped away before damage can be dealt to their health. Armored enemies cannot be staggered until the armor is removed, making it necessary for the player to watch for their tells more closely.
In a typical room encounter, you will face an initial wave of enemies, and you will have to use your dash, attack, special, and cast to deal with them effectively - dodging their attacks, slamming them into walls for extra damage, manuvering behind them for a backstab bonus, using room traps against them, and controling the space around you so you can manuever as you wish. After they have been dealt with, a second, third, fourth, and sometimes higher, wave will spawn in.
Once you clear a room, any poison, lava, traps, and enemy projectile attacks instantly disappear, preventing you from accidently taking damage.
Escaping and Choosing gear and boons
You begin your escape attempt by selecting your gear: the weapon, the keepsake and the companion you'd like. Each escape attempt is composed of a number of rooms. Most rooms have enemies in them, which must all be killed before you can progress to the next room. Other rooms hold NPCs that you may interact with and receive aid from. Others will be simple reward chambers, giving you a boon, health boost, or health replenishment. Still others will allow you to purchase items from Charon. After clearing a room, you must claim your reward. If it is a boon, there will be 3 choices to choose from.
Although the sequence of room choices is randomly generated each playthrough, the rooms themselves are hand-designed. The size of the room varies, and there will be well-placed low-walls and columns that can block enemy movement or projectile attacks if placed between the enemy and Zagreus, and a number of different traps as well.
The boons that the Olympic gods grant come in several varieties: each god has one boon for each of your main abilities; Attack, Special, Cast, and Dash, and additionally a Call. Only one of these boons may be equipped at a time, but you are sometimes given the chance to swap boons. The Call ability must be charged up by dealing or receiving damage, and once it has been charged enough, you may call on that god for assistance. This might take the form of transforming Zagreus into a spinning blade that deals damage, in the case of Ares's call, or in calling down lighting strikes that repeatedly damage nearby enemies in the case of Zeus. Besides these 5 boons, each god has 16 other boons. These are organized in different tiers and have different requirements and conditions for appearing. 7 of these boons are duo boons, meaning they require you to have one specific boon each from two different gods. How do we get the number 7? Although there are 9 gods you can receive boons from, Hermes does not have any duos, and he has no boons in the five categories mentioned before, and of course a god cannot have a duo with him or herself. As an example, Demeter and Poseidon have a duo boon called Blizzard Shot, which requires that you have Poseidon's cast boon (called Flood Shot), and one of Demeter's Aid, Frost Flourish, Frost Strike, or Mistral Dash. Once acquired, when you cast, your bloodstone will move slowly, pierce foes, and fire icy shards around itself.
The remaining boons are modifiers of different kinds. They might increase the potency of health increase items or health replenishment items, or they might add their god's signature effect to an action. Poseidon has a boon called Typhoon's Fury, which increases the amount of damage you deal when you slam foes into walls. Most of the gods have a revenge effect - Ares's is called Curse of Vengeance, which inflicts Doom on surrounding foes after you take damage.
Chaos gives you a unique set of boons to choose from - each boon has some drawback that will be active for a number of encounters, and after that the drawback deactivates and you receive the perk of the boon. The drawback or curse is separate from the boon, so you get a kind of randomly generated loot item a la Diablo. You might get Abyssal Soul: Abyssal is the curse name, which means for the next 3-4 encounters you will take a massive increase in trap damage (300%-400%); Soul is the boon name, which indicates a certain gain in max health (between 30-80, depending on the rarity). To get a boon from Chaos, you need to enter a Chaos portal, which will cost some amount of health, unless you have the keepsake from Chaos equipped.
After picking your reward, you must move on to the next room. Typically, you will have between 1 to 3 doorways to choose from, and you can see the type of reward above the doorway. So, you might have to choose between a Zeus boon and Demeter boon, or between a Daedelus upgrade and Obols, or many other combinations. For those mathematically inclined, if you have three rooms, there are 1140 combinations, or for two rooms there are 190 combinations. For one room, there are 20 possibilities.
House Development and Decoration
As you make repeated escape attempts, you will receive several different rewards. The boons from the gods disappear once you return to your house, as do any Obols you've collected. These are the gold coins placed on the tongue of the dead to pay Charon for the ride into the underworld. Gems, Darkness, Nectars, Keys, Titan Bloods, Diamonds, and Ambrosias will stay with you. Gems and Diamonds will primarily be used for improving the house. For example, you can pay 45 Gems to put down an Elysian Rug in the lounge. This has no gameplay effects, but allows you to control the look of the house, and serves as a sink for this resource. Or, you can unlock new songs for Orpheus to play by paying the required number of Diamonds.
Generally, projects that effect gameplay require a number of Diamonds. You can purchase rest rooms that will appear randomly in different regions, giving you a chance to replenish your health if necessary, but there are many other projects.
Relationship Development
Hades has been described as having dating sim elements, and this is somewhat true. Each character you can interact with has a heart meter indicating how much they like you. You can increase their heart meter by giving them gifts - initially nectar, and after you have maxed out their first rank (usually 4-6 hearts), you must give them ambrosia to continue to increase their heart meter. In the early stages of the game, you can also increase their heart meter by having a set number of conversations with them.
Increasing an NPC's heart meter has granular benefits. The first heart unlocked will give you a keepsake from that character which you can carry into battle to receive some perk. Giving them more nectars will unlock additional hearts, and reveal more backstory for that NPC, but has no effect on gameplay. For a limited number of NPCs, once all their basic hearts have been unlocked, you must switch to Ambrosia to unlock the next tier. The first Ambrosia will trigger the NPC to give you a companion keepsake, which functions something like a call. You can use the companion keepsake to receive help on a tough encounter or boss battle. So, Skelly's companion will spawn in Skelly himself, who will aggro the enemies until his health drops to zero. Unlike calls, these companion keepsakes can only be used once per encounter, although by spending Ambrosia to upgrade the keepsake, you can increase the number of times per escape attempt that each may be used.
Similarly to the conversations, giving a Nectar or an Ambrosia can only be done once per NPC per escape attempt, so you cannot farm Ambrosia, then max out your relationship with Achilles, Medusa or another NPC in one go.
Where Hades departs from most dating sims is in the lack of branching paths and in the ability to lose. In typical dating sims, you will be able to take different routes with each character. Some of them will lead to furthering your relationship, while others might actually lead to a loss of connection. None of this is possible in Hades. The closest Hades comes is whether you choose to consumate your relationship with the three romanceable characters.
Inventory
Hades has a very basic inventory system. There are no limits regarding the number of resources of any type you can hold, so you will not have to manage inventory slots or spaces. The most you will interact with your inventory is by trading. A trader shade eventually appears in the lounge, and you can sell gems for keys, keys for nectars, nectars for diamonds, diamonds for ambrosia, and ambrosias for titan bloods. The trader also sometimes has a limited offer, which might allow you to reverse one of the previous trades (selling titan bloods to get ambrosia, for example), or have a better deal (trade ten gem stones for one nectar).
Level up
Although Hades is a rogue-like game, like many rogue-likes in the last 11 years (I'm thinking of the games by FROM Software, Dead Cells by Motion Twin, Salt and Sanctuary by Ska Studios, and many others) not all the player's progress is lost upon death. You do return to the House of Hades, and you do lose all the Daedelus weapon upgrades, health upgrades, Obols, and boons from gods that you had collected during your previous run, but you don't lose Diamonds, Keys, Titan Bloods, Ambrosias, Darkness, or Nectars, and some of these are the key to advancing your character.
The weapons are all unlocked using different numbers of keys. These are one of the randomly generated room rewards, and you can also trade gems to get more keys at the trader in the lounge in the House of Hades.
Titan Bloods are mainly obtained by defeating the Furies and Hades for the first time with a weapon on a particular Heat level (we'll talk about Heat later). You will learn more about each of your weapons as you play, and you will eventually find that there are different aspects to each weapon. These aspects can be unlocked and upgraded using Titan Bloods. The gun, Exagryph, has an aspect called the Aspect of Lucifer. Using this aspect changes the bullets into a continuously firing laser beam, and changes the bomb into a small orb of Hellfire that deals a small amount of damage each second to an area, and if caused to explode deals a massive amount of damage to that area. Each aspect of the weapons change the default attack animations, timing, damage, and even behavior of the weapon.
Another facet of leveling up involves Keys and Darkness. Nyx has given you a Mirror of Night, and you can use Keys to progressively unlock more stat modifiers, and invest Darkness to increase the stat buffs. A buff called Shadow Presence allows you to deal +15% damage to enemies at full health. You can increase this buff 5 times, giving you +75% damage. Other buffs alter the chances of receiving legendary or duo boons, change your maximum starting health, or alter how the bloodstones behave.
Manage Heat Level
When you first defeat a boss with a weapon, you will receive that boss's unique reward: for defeating the Furies at the beginning and Hades at the end, you get Titan Blood, for defeating the hydra you get a diamond, and for defeating Theseus and Asterius you get an Ambrosia. If you attempt another escape on the same heat level, you will receive a reward of darkness instead. In order to unlock the unique rewards again, you need to first complete an escape attempt on the current heat level (from the Furies all the way to Hades) with that weapon, then increase the heat level. Heat is managed through the Pact of Punishment. After defeating Hades the first time, this will unlock. Before leaving the House of Hades on an escape attempt, you can choose from different conditions on the Pact of Punishment. Each condition increases the heat level by some amount. The Hard Labor condition increases enemy damage by 20%, and increases the heat level by 1 for each rank of Hard Labor. It comes in 5 ranks, so you can increase the heat level to 5 just by increasing the rank of Hard Labor. Or you might choose Benefits Package, which gives armored foes one perk for each rank. The first rank increases heat by 2, and the second rank increases heat by 3. There are 13 other conditions that you can choose from. One point to keep in mind is that you can only collect bounties on the lowest heat level which you have not yet completed. So if you have completed heat level 2 with the bow, if you set your heat level to 4, you will only collect the reward for heat level 3.
To belabor this point a little, this matters because you only get the unique reward on the first victory over the boss per weapon per heat level. If you want to get another Ambrosia, for example, there are only two other ways to get it. One is by completing a minor prophey that has an Ambrosia as a reward. As you play the game, you will quickly reach a limit, as you will already have completed the easier Minor Prophesies, and only the more difficult ones will remain. Eventually, you might have no Minor Prophesies left to complete. The other is by completing many escape attempts and farming Gems, then progressively trading Gems for Keys, Keys for Nectars, Nectars for Diamonds and Diamonds for Ambrosias. To get one Ambrosia in this way requires 1000 Gems! Since you can exchange one Ambrosia for one Titan Blood, one Titan Blood also costs 1000 Gems. So if you are not willing to increase the heat level, you need to get yourself ready for a lot of grinding to get the necessary gems to increase your relationship with an NPC, or to get that next aspect of a weapon.
Resources
There are a number of different resources.
- Zagreus's health: Self-explanatory.
Conflicts
There are a number of conflicts in Hades. In terms of story and gameplay, there is the conflict between Zagreus and his father, and by extension the minions that you face throughout your escape attempt. Your father does not wish you to escape, and the minions have been tasked with stopping you.
There are also conflicts between Olympus and the underworld. There are conflicts between the Olympic gods themselves. The former have already been discussed in the story section. Regarding the latter, these appear when you enter a room with boons from two gods. You will have to choose one of them, and then you will have to clear the spawned in enemies to receive the second reward. During the encounter, you will also face abilities from the god that you spurned - waves that seek you out in the case of Poseidon, or an AOE that makes enemies inside it temporarilly invincible in the case of Athena.
There are conflicting choices facing you regarding the encounter rewards. Do you take the Centaur Heart, which increases your health or do you take the Obols for a purchase at Charon's Well later on? The choice depends on your current boons and Daedalus upgrades, as well as how you like to play.
In more detail for the boon rewards, the choices will also depend on the above factors. You will have to choose whether to focus on increasing your critical chance (Deadly Strike from Artemis) or firing a seeking arrow when you cast, attack or special (Support Fire from Artemis), or gaining extra bloodstones (Fully Loaded from Artemis).
There are further conflicts regarding when you can use companion keepsakes. Thanatos, Achilles, Maegara, and Dusa's companions may not be used against Hades, since they are essentially his employees. Later on this restriction is lifted, though. Maegara's companion may also not be used in the Fury boss battle.
Regarding the boons from the gods, there are a large number of restrictions and limitations. To start with, as mentioned before, you can only equip one boon for each of your 5 abilities. There are further restrictions regarding weapon aspects and boons. Normally, your cast throws out a bloodstone, but if you have the Aspect of Beowulf equipped for your shield, you load the bloodstone into your shield, and when you do your shield bash, the attack transforms into the "Dragon Rush," and further gains any buffs that would normally be applied to your cast. Any cast boons that drastically alter the behavior of the cast cannot be combined with this Aspect, such as Artemis's True Shot or Demeter's Crystal Beam. Hades deals with these boon/aspect conflicts by simply preventing incompatible boons from spawning in, so you are never presented with a false choice.
Hades deals with Daedelus weapon upgrades in the same manner. The Cruel Thrust upgrade for the sword cannot be combined with the Aspect of Arthur, but you will never see that upgrade appear while you are using that aspect. Besides conflicts between aspects and Daedelus upgrades, there are conflicts between Daedelus upgrades. So, the Flurry Slash upgrade, which transforms your attacks into all slashes for the sword, cannot be combined with Cruel Thrust, which gives bonus damage to thrusts.
Boundaries
There are a number of different boundary conditions in Hades. You can only use one weapon per escape attempt. After defeating each boss, you will enter a special room where you can:
- replenish your health at a fountain
- sell up to three boons to receive Obols
- change your keepsake
- buy items from Charon's well using Obols
You can also only use one companion keepsake per escape attempt. You are allowed change your regular keepsake, as long as you have not already used it before in that escape attempt.
You cannot give Nectars or Ambrosias to NPC's once you have maxed out their heart meter.
Since there are a limited number of Pact of Punishment conditions, you can only increase the heat level up to 63, although you can only collect the unique boss rewards up to heat level 20.
Despite the conflicts and limitations mentioned so far, there is a huge host of different possibilities regarding builds. Each escape attempt features one aspect of one weapon, and since there are 6 weapons with 4 aspects each, that yields 24 different ways to play. When you add in the gods' basic boons (I mean the ones for Attack, Special, Dash, etc), you can easily calculate that there are 8 gods each with a boon there, and there are no restrictions that your attack boon imposes on your special or that your call boon imposes on your dash etc, so there are 8 X 8 X 8 X 8 X 8, or 32,768 possible combinations. Combining this with the different weapons and aspects gives you 786,432 possibilities. Then there are the duo boons, the second and third tier boons dependent on different combinations of basic boons, and the boons that are not tied to a specific ability, such Demeter's Frozen Touch, which inflicts chill on enemies around you after you take damage. These latter boons can be obtained no matter what other boons you have.
And, we have not touched on Hermes's or Chaos's boons, as these do not take up an ability slot. So, while there is a definite limit on how boons, weapons, and aspects may be combined, there is a large state space for the player to explore.
Outcomes
There is one main outcome for the game, with several smaller ones for each of the side quests. The main outcome has already been described in the story section and hints have been dropped regarding the side quests there as well.
Dynamic Elements
The dynamic friction pattern appears in a number of different forms. The unlocking of different buffs in the Mirror of Night is one example. Unlocking more and more buffs requires larger numbers of keys, and several of the buffs require progressively larger amounts of darkness to upgrade.
The dynamic friction pattern also works together with the static friction pattern in the Mirror of Night. Many of the buffs do not require larger amounts of darkness, but simply the same static payment each time.
The static friction pattern appears by itself in the house customization elements. These cost a set amount of gems and although they do allow you to customize the look of the house, serve mainly as drains for gems.
The slow cycle makes several appearances in Hades. The medium large slow cycle is making a particular escape attempt. You start in roughly the same state each time, and by the end you have gathered a host of different boons and power-ups creating a custom build in order to defeat your father and see your mother. This resets when you die, which happens whether you are victorious or not.
A smaller slow cycle appears in each area of the game, where you first face smaller groups of enemies, before gradually climaxing with a boss battle. Both these scales of slow cycle also incorporate the escalating challenge pattern, as the difficulty increases as you progress through each area, and also as you approach the final boss.
The largest instance of the slow cycle and escalating challenge appears when you have unlocked the Pact of Punishment. As you push yourself to get more unique rewards, you will play through the game multiple times with different weapons and under different heat levels, gradually increasing the heat level as you master different strategies at the lower difficulty levels.

The playstyle reinforcement pattern appears in numerous ways. This frequently appears with the worker placement pattern. One example of the playstyle reinforcement is in the weapons and the Mirror of Night upgrades. Each buff has two variations, and you may choose the one which better matches how you like to play. Personally, I'm not great at avoiding damage, so I usually have the Thick Skin buff and the Death Defiance buff, which increase your health and the number of lives you have, respectively.
Another instance is in the weapon and aspect choices. In the early stages of the game, you only have the sword, but once I unlocked the spear, it became one of my favorites. Now that I've put much more time in the game, I often use the Aspect of Zeus on the shield, or the Aspect of Talos on the cestus. I'm sure other players have other weapons and other aspects that they prefer.
The reason I say this is worker placement is because in between escape attempts you are allowed to switch weapons and companion keepsakes, without consuming resources. You simply move your choice from one to another.

The static engine is used throughout Hades, primarily as the reward generator. You are guaranteed to get some reward after completing an encounter, and you have some influence over what the reward is, since you can choose different rooms as you complete an escape attempt.
The converter engine appears mostly in the trader, where you can trade gems for keys, keys for nectars...you remember how it goes. This is not an example of the trade pattern, because of the limited options for purchases.

The stopping mechanism appears throughout Hades. In terms of combat gameplay, there is a limit on the number of times you may dodge in a row. This prevents the player from zipping around the rooms basically immune to damage.
The requirement to charge up your god gauge in order to use your call is another instance of the stopping mechanism. The calls are quite powerful abilities, and without the god gauge it would be quite easy to spam them and breeze through otherwise difficult encounters.
Similarly, the restrictions on the uses of companion keepsakes function as stopping mechanisms. Sisyphus's companion, Shady, drops a rock on enemies that deals 1000 points of damage in an area, and also spawns in a care package of health, Obols and Darkness. Since this can only be used once per combat encounter and a maximum of 5 times per escape attempt, the player is prevented from abusing it.
The stopping mechanism also appears in the NPC interactions throughout the game. As mentioned before, you can only interact once with an NPC in the House of Hades, and you can only give one gift to that NPC or god per escape attempt. While this is an instance of the stopping mechanism, the brilliant thing is that it actually encourages you to make another escape attempt in order to progress the story or deepen your relationship.
Conclusion
At the time of writing this, I have spent close to one hundred hours with Hades. The controls are smooth, responsive, and the combat feels great - you never feel totally over matched, but you never really feel invincible either.
Throughout over 100 escape attempts, I never came across a build that I felt broke the game, although I have found many builds that I'd like to try to recreate.
As someone who is quite familar with Greek mythology, I had a strong intuition for where the story was going early on, but I thoroughly enjoyed speaking with the characters and the gods. They are voice-acted wonderfully, and the dialogues do not overstay their welcome. And the way that players are encouraged to make just one more escape attempt in order to progress the story or further a relationship is brillant.
Overall, the design of the game is solid, and the mechanics work together to produce a thoroughly enjoyable experience time after time, play after play.
| God | Boon | |||||
|---|---|---|---|---|---|---|
| Aphrodite | Attack | Special | Cast | Dash | Call | |
| Title | Heartbreak Strike | Heartbreak Flourish | Crush Shot | Passion Dash | Aphrodite's Aid | |
| Description | Attack deals more damage and inflicts Weak (enemies deal less damage) | Special deals more damage and inflicts Weak (enemies deal less damage) | Cast is a wide and short blast and inflicts Weak | Inflicts Weak where you end up | Fire a seeking project that inflicts Charm (enemy fights for you for a short time) | |
| Other | ||||||
| Title | Different League | Life Affirmation | Wave of Despair | Dying Lament | Empty Inside | |
| Description | Resist damage from nearby foes' attacks | Any life increase or healing chamber rewards are worth more | When you take damage, inflict Weak on nearby foes | When foes are slain, they inflict Weak on nearby foes | Your Weak effects have a longer duration | |
| Title | Cold Embrace | Sweet Surrender | Broken Resolve | Unhealthy Fixation | Blown Kiss | |
| Description | Your cast crystal fires its beam directly at you for 4 seconds | Weak-afflicted foes are also more susceptible to damage | Your Weak effects are more potent | Your Weak effects also have a chance to Charm foes | Your cast shoots farther and is stronger against undamaged foes | |
| Title | Smoldering Air | Sweat Nectar | Parting Shot | Heart Rend | Curse of Longing | |
| Description | Your call charges up automatically, but is capped at 25% | Any Poms of Power you find are more effective | You cast gains any bonuses you have for striking foes from behind | Your Critical effects deal even more damage against Weak foes | Your Doom effects continuously strike foes | |
| Title | Low Tolerance | |||||
| Description | Your hangover effects stack even more times against Weak foes | |||||
| Daedalus Upgrade | Infernal Arm | ||||||
|---|---|---|---|---|---|---|---|
| Stygius | Varatha | Aegis | Coronacht | Malphon | Exagraph | ||
| N/A | 4 keys | 3 keys | 1 key | 8 keys | 8 keys | ||
| Title | Breaching Slash | Extending Jab | Dread Flight | Twin Shot | Breaching Cross | Flurry Fire | |
| Description | Your armor attacks deal +300% | Your Attack has more range and deals +40% damage to distant foes. | Your Special can strike up to 4 additional foes before returning. | Your Attack fires 2 shots side-by-side, but has reduced range. | Your Dash-Strike pierces foes and deals +900% damage to Armor | Your Attack is faster and more accurate; gain +6 ammo capacity. | |
| Title | Cruel Thrust | Chain Skewer | Sudden Rush | Sniper Shot | Rolling Knuckle | Ricochet Fire | |
| Description | Your thrust deals +200% damage and has +40% Critical chance | Your Special bounces to up to 7 foes, dealing +30% damage for each. | Your Bull Rush charges much faster. | Your Attack deals +200% damage to distant foes. | Your Dash-Strike deals +60% damage; added to Attack sequence. | Your attack bounces to +1 other foe | |
| Title | Cursed Slash | Breaching Skewer | Pulverizing Blow | Explosive Shot | Long Knuckle | Spread Fire | |
| Description | Your Attack restores 2 Health, but you have -60% Health. | Your Special deals +400% damage to Armor. | Your Attack hits twice, but does not knock foes away. | Your Attack deals +300% damage in an area, but charges slower. | Your Attack has more range and deals +10% damage | Your Attack becomes a short spread that deals 40 base damage; lose -6 ammo capacity. | |
| Title | Dash Nova | Vicious Skewer | Dashing Wallop | Flurry Shot | Draining Cutter | Explosive Fire | |
| Description | Your Special makes you lunge ahead, then become Sturdy for 0.8 Sec. | Your Special deals +50% damage; +50% Critical chance on recovery. | Your Dash Attack deals +50% damage in a larger area. | Hold Attack to shoot rapidly, but you cannot Power Shot. | Whenever your Special slays foes, restore 2% life | Your Attack deals damage in an area and briefly slows foes. | |
| Title | Double Edge | Exploding Launcher | Explosive Return | Piercing Volley | Concentrated Knuckle | Delta Chamber | |
| Description | Your Dash-Strike hits twice and deals +20% damage. | Your Special is replaced with a shot that deals 50 damage in an area. | Your Special deals 50 damage to nearby foes when you catch it. | Your Special pierces foes and deals +400% damage to Armor. | Your Attack deals +5 base damage for each uninterrupted hit to a foe. | Your Attack is a 3-round burst; you never have to Reload. | |
| Title | Double Nova | Massive Spin | Minotaur Rush | Perfect Shot | Explosive Upper | Piercing Fire | |
| Description | Your Special hits twice but no longer knocks foes away. | Your Spin Attack deals +125% damage and hits a larger area. | Your Bull Rush gains a Power Rush that does +500% damage. | Your Power Shot is easier to execute and deals +150% damage. | Your Dash-Upper deals +100% damage in an area | Your Attack pierces foes and deals +50% damage to Armor. | |
| Title | Flurry Slash | Quick Spin | Breaching Rush | Relentless Volley | Flying Cutter | Triple Bomb | |
| Description | Hold Attack to strike rapidly, dealing 25 base damage per hit. | Your Spin Attack charges and recovers much faster. | Your Bull Rush deals +400% damage to Armor. | Your Special shoots +4 shots. | Hold Special for longer range and up to +100% base damage | You can use your Special 3 times in rapid succession. | |
| Title | Hoarding Slash | Flurry Jab | Charged Shot | Triple Shot | Rush Kick | Rocket Bomb | |
| Description | Your Attack deals bonus damage equal to 5% of your current Obols. | Hold Attack to strike rapidly, but you cannot Spin Attack. | Your Bull Rush instead fires a piercing shot that deals 80 base damage. | Your Attack fires 3 shots in a spread pattern. | Your Special becomes an advancing kick that also deals 40 base damage twice | Your Special is replaced with a rocket that deals 80 base damage. | |
| Title | Piercing Wave | Charged Skewer | Charged Flight | Charged Volley | Quake Cutter | Targeting System | |
| Description | Your Attack fires a wave that pierces foes, dealing 30 damage. | Hold Special to charge your skewer for up to +200% base damage. | Hold Special to charge your throw for up to +200% base damage. | Hold Special for up to 350% base damage; minimum range is reduced. | After using your Special, deal 90 damage in an area where you land | Foes targeted by your Special move slower and take +30% damage. | |
| Title | Shadow Slash | Serrated Point | Empowering Flight | Chain Shot | Kinetic Launcher | Hazard Bomb | |
| Description | Your Attack deals +200% damage when striking foes from behind | Your Dash-Strike hits 3 times, but your dash has -25% range. | After your Special hits, your next 2 Attacks deal +80% damage. | Your Attack bounces to up to 3 foes, dealing +15% damage for each. | Your Special becomes a charged ranged attack that deals 50 base damage. | Your Special deals +300% base damage in a large area, but can hurt you. | |
| Title | Super Nova | Flaring Spin | Dashing Flight | Point-Blank Shot | Heavy Knuckle | Cluster Bomb | |
| Description | Your Special hits a wider area and deals +20% damage. | Charging your Spin Attack makes you Sturdy and pulse 40 damage. | While you Dash, your Special is faster and deals +200% damage. | Your Attack deals +150% damage to nearby foes. | Your Attack becomes a slower 3-hit sequence, each deals 40 base damage. | Your Special fires a spread of 5 bombs, but each deals -30% damage. | |
| Title | World Splitter | Triple Jab | Ferocious Guard | Concentrated Volley | Colossus Knuckle | Seeking Fire | |
| Description | Your attack is replaced with a big chop that deals 90 base damage | Your Attack strikes 3 times in a spread pattern. | After blocking a foe, gain +20% damage and move speed for 10 Sec. | Your Special deals +3 base damage for each consecutive hit to a foe. | While using your Attack or Special, you are Sturdy | Your Attack seeks the nearest foe and deals +10% damage. | |
| Title | Greater Consecration | Winged Serpent | Unyielding Defense | Repulse Shot | Rending Claws | Concentrated Beam | |
| Description | Your Holy Excalibur aura is +45% larger and makes foes +10% slower | Your Frost Fair Blade Spin Attack travels for +80% longer. | After using your Naegling's Board Cast, you are Sturdy for 3 Sec. | Your Celestial Sharanga Attack creates a Blast Wave around you. | Maim-afflicted foes take +25% damage and move 30% slower | Your Igneus Eden Attack damage to a foe ramps up +100% faster. | |
| Title | Flash Fire | ||||||
| Description | Your Igneus Eden Attack starts firing and fires +50% faster with +15% range. | ||||||
| Title | Triple Beam | ||||||
| Description | Your Igneus Eden Attack fires 3 beams in a spread pattern. | ||||||
| Title | Eternal Chamber | ||||||
| Description | Your Igneus Eden has ∞ ammo, but its damage no longer ramps. | ||||||
| Title | Greater Inferno | ||||||
| Description | Your Igneus Eden Hellfire radiates +250% damage in a larger area. | ||||||
Subscribe to:
Posts (Atom)